Dec 07
Drawing a robot
Posted by Benedikte Vanderweeën on 07/12/2012
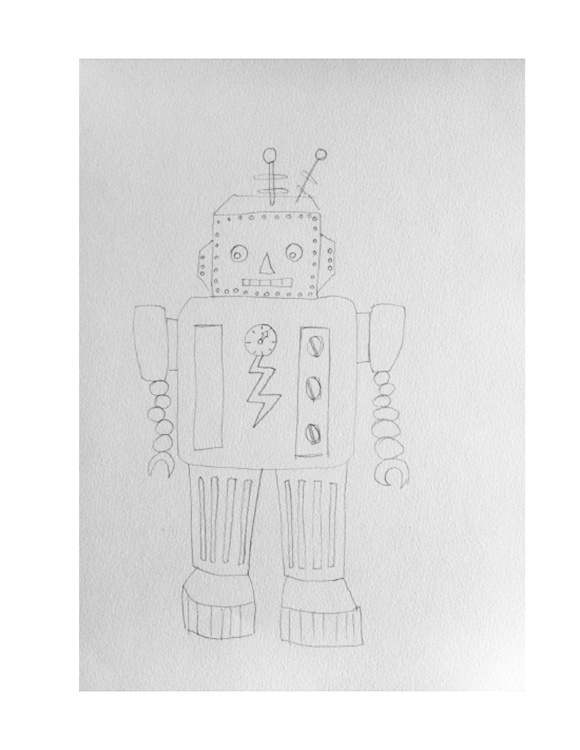
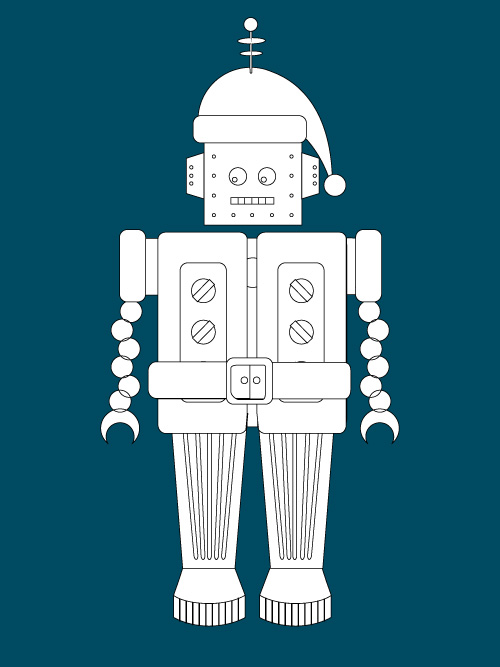
My son asked me to draw him a robot. I did a few sketches from older postcards and started to draw the robot in Illustrator. I made this tutorial on how to draw a robot with simple shapes like rectangles, circles, triangles and other simple combined shapes. With this basic shape, you can make a Christmas robot out of it, like i did in the illustration or choose whatever you like to make the robot more stand out. Hope you enjoy it!


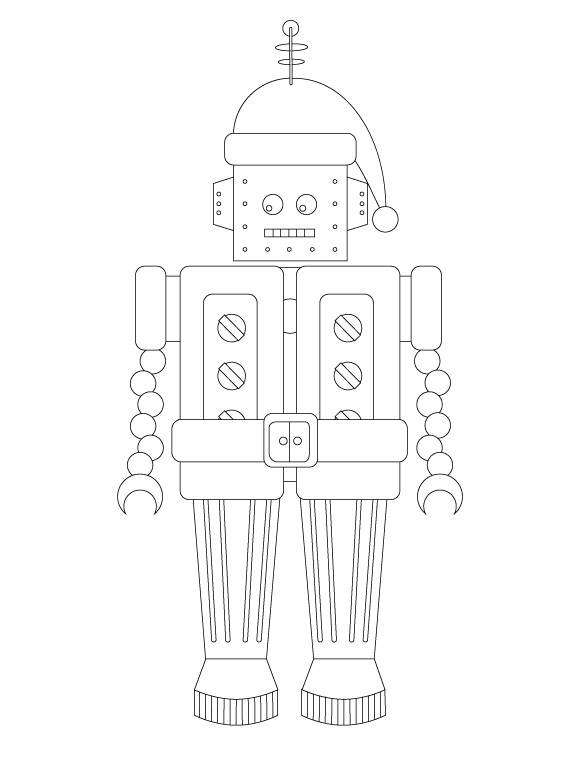
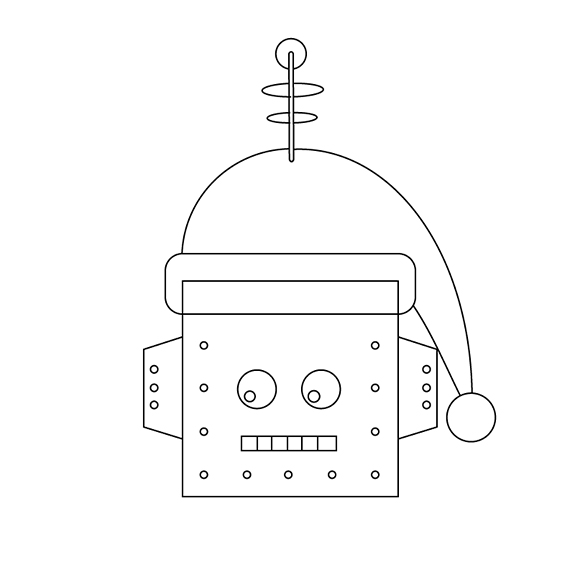
Final Robot
What we'll be drawing.
I'm going to explain step by step how i drew the robot shape. I'm sure there are other ways to complete this tutorial, send me an e-mail if you have suggestions or remarks. Feedback is much appreciated. So, here we go:
Step 1
Make a new document and place a sketch
You can make a sketch and take a photograph of it. Place it in Adobe Illustrator on a new layer and make a template layer from the sketch layer. You can make it even more simple and start from scratch. Create a new document, A4 predefined dimensions and RGB mode.
Step 2
The head
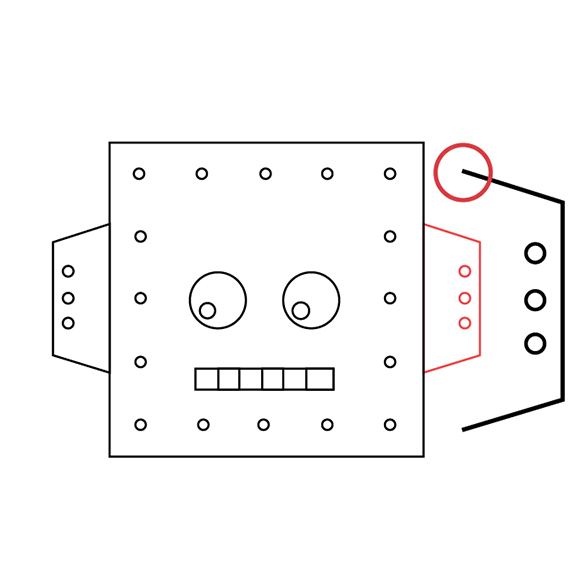
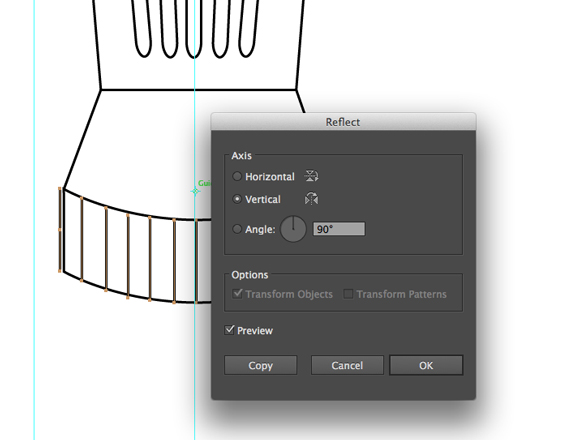
Start by creating a new layer, name it "Head" and selecting the Rectangle Tool (M) in the tool palette en hold down the Shift Tool (constraints) while drawing the rectangle in the middle of the document. Next, select the Ellipse Tool (L) and draw a circle for the eye, while holding down Shift for a perfect circle. Draw another circle half the size of the eye and place it inside the first circle. Select both circles and hold down the "alt" key while dragging the selection to the left to create the second eye. With the circle tool still selected, draw small circles at the edges of the face en drag copies until you have the buttons like shown on the example. Select the rectangle tool and hold down the Shift key to constraint the shape and draw 6 rectangle shapes, place them next to each other using the "align" palette. These are the mouth. Next we'll draw the ears by drawing a rectangle shape, select the direct selection tool (white arrow under the black arrow) and select the left side of the rectangle. Click delete to remove it and select the anchor point on top to widen the rectangle, do the same with the other anchor point to form the ear. Place 3 circles on the ear. Select all the ear elements and click the Reflect Tool (O) and next click in the middle of the head while holding down the Alt key. The Reflect dialog pops up, select "Vertical" for Axis and click Preview. The other ear should appear on the left side of the head.
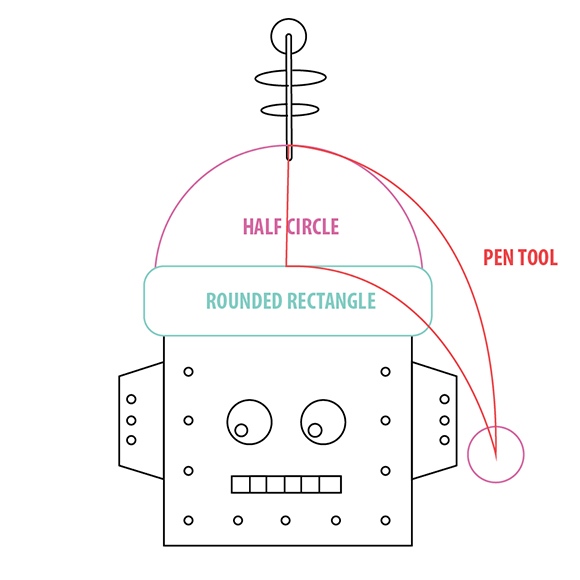
Now, we have to draw the hat. Start by selecting the Ellipse Tool (L) while holding down shift and draw a circle the size of the head on top of the head. Delete the under half part of the circle by selecting the Direct Selection Tool (A), select the bottom part and click Delete. Next, draw the right part of the hat by selecting the Pen Tool (P) and drawing the over the shape, adjust with the curves and close the path. Draw a circle for the white pompom. With the circle part selected, select the Pen part and go to the Pathfinder palette and click Unite to combine both shapes to 1. Select the Rounded Rectangle Tool and draw in front of the other hat parts to finish the hat.
Step 3
The upper body part
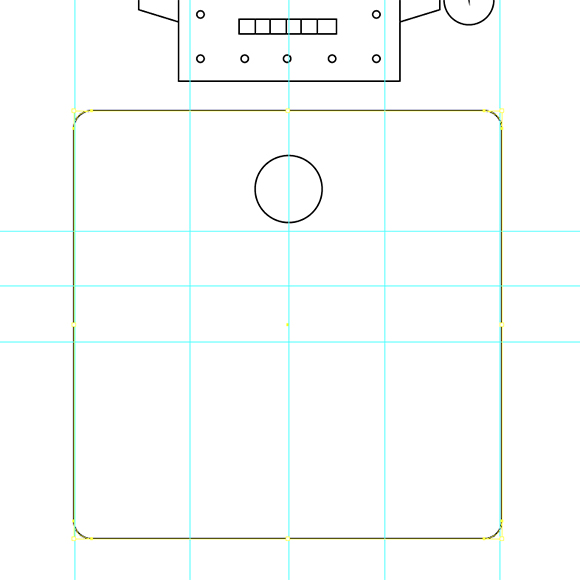
For the body part, we start by drawing a rounded rectangle shape. Select the rounded rectangle shape and start dragging from the middle out while holding down Alt and Shift (contraint from the middle out). The shape is approximately 290 by 290 px. Draw a circle in the upper centre part. Next draw the right part of the body and align it to the right side. Draw the inside with a rounded rectangle shape half the size of the outer part. Draw 1 circle inside of this part and select the Rectangle Tool (M) and draw a rectangle in the center of the circle shape and rotate it -45 degrees by double clicking the Rotate Tool (R). Copy this shape 2 times beneath the first. Select all right parts. Reflect this selection to the left by clicking the Reflect Tool (O) and next click in the centre of the body while holding down the Alt key. The Reflect dialog pops up, select "Vertical" for Axis and click Preview and Copy. The left part should appear on the left side of the body.
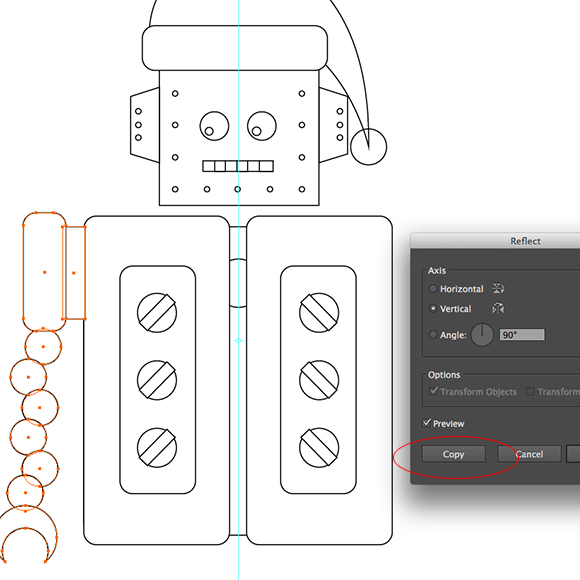
Drawing the arms is similar to the body part. First, draw the right arm with the Rectangle Tool (M), the Rounded Rectangle Tool, 6 circles beneath each other (twisted, not in a straight line) with the Ellipse Tool (L) and use the Reflect Tool (O) for the left arm. Once you have these parts, start with the hand, draw 2 overlapping circles, select both and click the second button under Shape Modes: Minus Front in the Pathfinder palette.


Step 4
The legs.
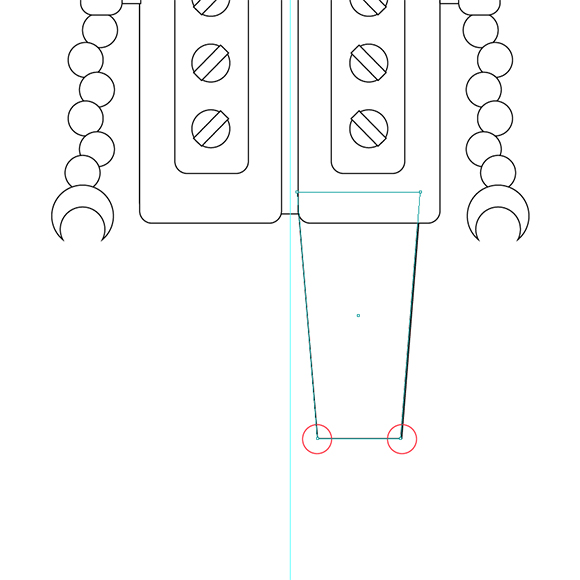
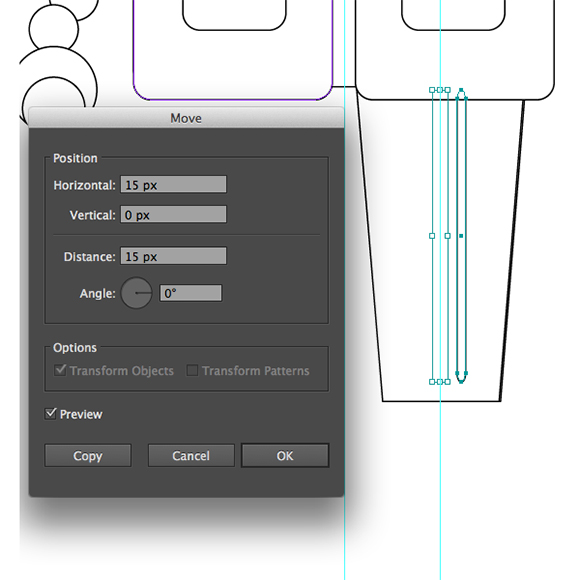
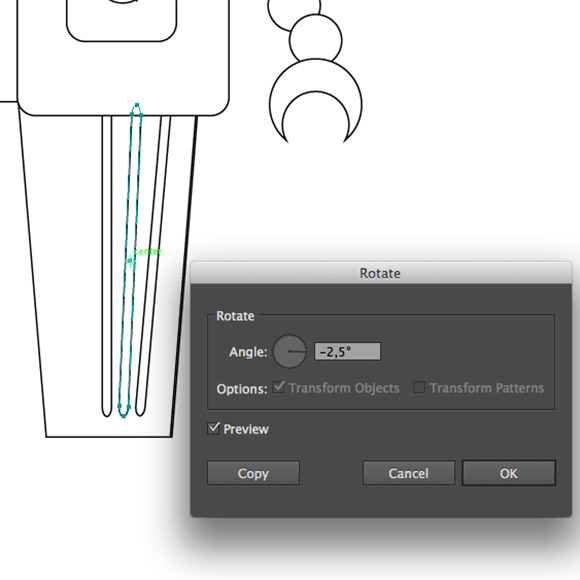
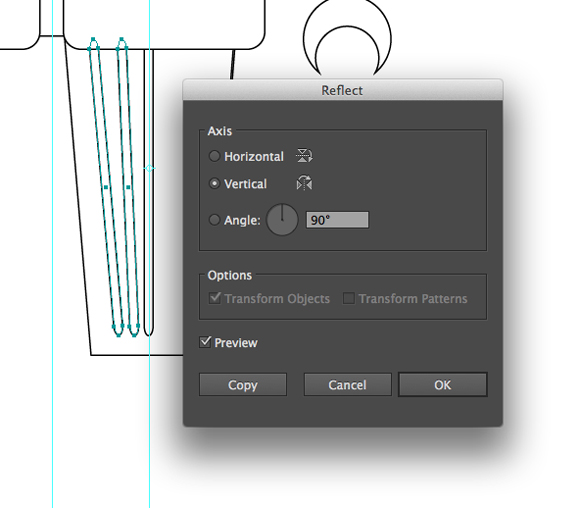
We'll draw 1 leg and 1 shoe on the right side, once these parts are finished, we'll select them and reflect them to the left side. Start by selecting the Rectangle Tool (M) and draw a rectangle under the body. Select the Direct Section Tool (A) and move the bottom anchor points towards the centre of the rectangle. Do this for both sides until you have a shape of a leg. Next, select the Rounded Rectangle Tool and draw a small, long shape in the centre of the leg. Select this shape and go to the menu > Object > Transform > Move (Shift+ Cmd + M) and fill out: 15px Horizontal Position and, 0 for Vertical and 0 for Angle and click Copy and Cmd + D to repeat this action. Select the outer shape and double click the Rotate Tool (R), fill out -5 degrees by Angle and click OK, select the second shape and double click the Rotate Tool (R), fill out -2,5 degrees by Angle and click OK. Select the 3 shapes and click the Reflect Tool (O) and next click in the centre of the leg while holding down the Alt key. The Reflect dialog pops up, select "Vertical" for Axis and click Preview and Copy. Now, select the whole leg with the inner parts and reflect them to the left using the same method.
Step 5
The shoes
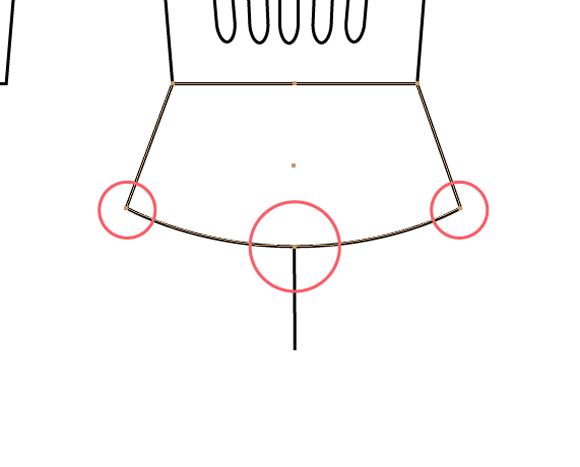
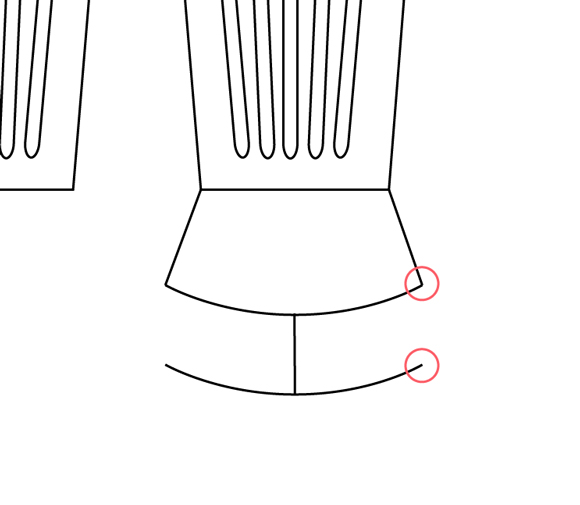
Start by selecting the Rectangle Tool (M) and draw a rectangle under the right leg. Select the Direct Section Tool (A) and move the bottom anchor points outwards the rectangle. Add an anchor point in the centre of the bottom line of the rectangle by selecting the Pen Tool (P) and select the Add Anchor Point Tool and click with this tool selected in the centre of the line to add an anchor point. Now select the Convert Anchor Point Tool (Shift + C) and click with this tool selected on the new added anchor point and hold down the mouse button. Select the Direct Section Tool (A) and drag the anchor a bit beneath the rectangle to form the shape of a shoe. Use the same tool to drag the curves and adjust the shape.
Select the Scissors Tool (C) and click both the bottom anchor points left and right to cut the line. Select the Direct Section Tool (A) and drag the line to the bottom while holding down "Alt" to make a copy of this line. Connect both the end anchor points on the right side and left side by selecting the 2 points with the Direct Section Tool (A) and choose from the menu Object > Path > Join (Cmd + J). Draw a straight line with the Line Segment Tool between the upper part and lower line in the centre of the shoe. Select it and click Shift + Cmd + M and fill in 10px for Horizontal Position, check Preview and click Copy. Click Cmd + D (Transform Again) a few tiles to repeat the lines. Remove the lines until they fit in the shoe shape. Select all the right part lines and Reflect them to the left side by selecting the Reflect Tool (R) and copy the right shoe part to the left. Remove parts that are not necessary.
Step 6
Color the Robot
Select a palette for coloring the robot. I checked a few sites where you can download nice color palettes:
- Adobe Kuler (Flash site!)
- Colour Lovers
- Dribbble shots
- overview of Color palettes sites: The 20 best tools for choosing a colour scheme
Now that the shape of our robot is finished, we can start coloring it. I found a palette for a robot on Kuler, and combined it with another palette for Christmas for the red parts. Download it here:

Step 7
Using the color tools
Before I start to color the shapes, i duplicate the draw layer, so in case something goes wrong, i still have a copy of my drawn shape. Copy the layer by selecting it in the Layers Panel and dragging it to the new symbol at the bottom of the panel, a copy of the layer will be added in the palette.

Step 8
Color groups
Before you start coloring, take some time to analyze the figure: group elements that will have the same color before starting to use the Live Paint Bucket. Check out this Lynda tutorial about the Live Paint Bucket before you start the coloring:
I hope you enjoyed this tutorial, try some examples yourself, download the Illustrator files here:
Download the Illustrator file with shape and color:

Connect